Hello world! Welcome back! This is CS50! Congratulations you’ve done the introduction of programming in C. Now, we will have new languages. This problem set teaches you how to teach yourself about, HTML, CSS, PHP and SQL. As always, you’ll want to read the below.
Recommended Reading :
• http://diveintohtml5.info/
• http://php.net/manual/en/langref.php
HTML
What is HTML actually? HTML (Hyper Text Markup Language) is the language where we use for webpage. But it doesn’t a language actually, because it doesn’t allows to express logic like for-loops, while-loops, conditions and alike rather is indeed a markup language that allows to specify what the webpage should look like, structurally and statically. And it does show by way what we called text. Let’s dive in the simple example for a webpage that print “Hello, World!”.
Open up gedit and let’s make a file called hello.html and save it into public directory that is indeed inside of localhost directory that is indeed inside of vhosts directory and this is is indeed inside of jharvard appliance :
 <!DOCTYPE html>

<html>
    <head>
       <title>hello</title>
    </head>
    <body>
       Hello, World!
    </body>
</html>
CSS
It turns out that HTML is not the only language that you can use for webpage. Well, you’ll want to use CSS (Cascading Style Sheet) as well. CSS allows you the specify much more precisely the aestethics of webpage include layouts, sizes, colors, fonts and much more. I made a css file in a separate window, not inside the html window because it is more readable and effective. For instance let’s take a look an example below :
 /* Header */
.large-header {
 position: relative;
 width: 100%;
 background: #333;
 overflow: hidden;
 background-size: cover;
 background-position: center center;
 z-index: 1;
 -webkit-filter: opacity(60%);
}

.demo-0 .large-header {
 background-image: url('../img/pset0-bg.jpg');
 background-position: center bottom;

}

.main-title {
 position: absolute;
 margin: 0;
 padding: 0;
 color: #ffffff;
 text-align: center;
 top: 50%;
 left: 50%;
 -webkit-transform: translate3d(-50%,-50%,0);
 transform: translate3d(-50%,-50%,0);

}
PHP
PHP stands for PHP Hypertext Processor or PHP Hyepertext Processor Hyrtext Processor and we’ll stop there.. PHP is a recursive acronym. So, let’s write “Hello, World!” in PHP which a bit different that the “Hello, World!” in C that we’ve come to know and love. So, instead of creating a file called hello.c we’ll create hello.php. All of the PHP code will be contain between :
<?php

?>
If we have any PHP code that is located outside of this border, it won’t execute. We can have many PHP blocks as we want inside the single php file. In PHP, there is no need a “main” function. Instead, our PHP code will be run in order to appears in our PHP file. Both C and PHP have “printf” function for outputting data. But in PHP, we don’t need “#include” any headers file like “<stdio.h>” that is because in PHP we won’t be compiling our code. Unlike C, PHP is interpreted rather than compiled language that means the PHP code we write will be run through a special program called in interpreter which will turn and execute our code. So, to run our PHP code, we’ll send it along to the PHP interpreter which will handle execution rather than compiling it to the machine code. So let’s see interpreter in action. Well, open up the terminal and run the PHP command followed by the path to the PHP file we’d like to run.
jharvard@appliance (~/vhosts/localhost/html): php hello.php
Hello, world!
And there we go! That’s the output of our PHP program. We didn’t need to compile the file at all instead we had another program the PHP interpreter execute the source code that we wrote. PHP could do much more than simply “printf”. The syntax for constructs like if-else, while, for, switch, is the same in PHP and C. Just like C, each of this constructs use a braces { } to demarcate the body and just like in C, every line we write must end with a semicolon ;. However, variables are handled a bit differently in PHP. First, all of the variables we write have to use dollar sign $. Second, the PHP is loosely typed language. Which means you don’t need to explicitly list the type of the variable when you create it. So, where in C you say :
int x = 5;
char y = 'a';
in PHP we can simply say:
$x = 5;
$y = 'a';
The same apply to a functions rather than saying
int f() {....}
in PHP we can write :
function f () {....}
So we don’t need to explicitly specify the return type of the function f. Functions in PHP also don’t have to return the same type everytime they execute. For example, we used “return false” on an error or another type if its succeed. This also make generic functions. Well, in C we use pointers for arrays in strings, we won’t use the pointers in PHP instead both arrays and strings are built in types in PHP. To create an array in PHP we could use :
$a = array(1,2,3);
 or we can use
$a = [1,2,3];
We can indexed into this array using the same syntax that we’re use to from C. So, get the first element we’ll say :
$a[0];
PHP also have an associative array. And it just like a hashtable data structure that we’ve already seen in C. They mapped a key into a value. Example :
$staff = [
 "instructor" => "david",
 "tf" => "rob"
];
So here I have an associative array with two keys ‘instructor’ and ‘tf’. The => is use to separate the KEY and the corresponding VALUE. So, the value of $staff[“tf”] is a string “Rob”.
Or we’ll want to use :
$staff = [
 "instructor" => "david",
 "tfs" => [
      "rob",
      "tommy"
   ]
];
So now, the value of “tfs” is an ARRAY. That means the value inside in one associative array can be a different types. PHP arrays also do not having a fixed length. So, we can add or remove elements from an array. See http://php.net for more.
We’re about using PHP for web-development. PHP is a scripting language that can be use to implement a website on a web server. A web server is essentially a machine dedicated to providing content that can be access via the internet. So, when you navigate your way to facebook.com/home.php, the code in the file called home.php which lives on the facebook web server somewhere will be executed on that server. So, this code is likely generate some output which entirely sent from the server to your web browser. We’ll be using the CS50 appliance as web server. Well, we navigate to URL like http://localhost/hello.php we’ve configured the appliance via an application called Apache HTTP server to look for file called hello.php inside of home/jharvard/vhosts/localhost/html by default. If that file exists, then Apache will use the PHP interpreter to execute the PHP code in hello.php. If that file doesn’t exist, then Apache will throw it ‘Not Found’ error or 404 error which you’ll probably seen while browsing a web. So, let’s take a look at hello.php. We can see here that hello.php generates a single line of output.
<?php
printf("Hello, world!\n");
?>
When we ran hello.php at the command line below :
jharvard@appliance (~/vhosts/localhost/html): php hello.php
That output will printed in the terminal. See below :
jharvard@appliance (~/vhosts/localhost/html): php hello.php
 Hello, world!
Now when we access the file via the URL in the web browser, its output will be send to a web browser. So, heading to URL http://localhost/hello.php on your web browser, we can see it will print “Hello World!” on our web browser.
SQL
Se-quel or SQL isn’t a programming language but instead, it’s a language that provides a standard set of commands to retrieve and manipulate data from a variety of database management systems. For the purpose of CS50, we’ll go over four basic commands : SELECT, INSERT, UPDATE, and DELETE. Furthermore, we’ll utilize a database web interface called phpMyAdmin.
Getting Started
Well, we’re going to do a web-development in this problem set. Like problem set6, this problem set comes with distribution code that you’ll need to download before getting started. Let’s get you started! Per instruction (http://cdn.cs50.net/2014/x/psets/7/pset7/pset7.html). Now open up your appliance, then open up the terminal window and execute the below :
cd ~/vhosts
In order to navigate your way to ~/vhosts directory. Then execute :
wget http://cdn.cs50.net/2013/fall/psets/7/pset7/pset7.zip
in order to download the ZIP file. If you then execute :
ls
you should see that you now have a file called pset7.zip in your ~/vhosts directory. Unzip the file by execute :
unzip set7.zip
if you again execute :
ls
you should see that you now have a file called pset7. You’re now welcome to delete the file called pest7.zip by execute :
rm -f pset7.zip
next, execute :
cd ~pset7
followed by
ls
you should see the pset7 contains three subdirectories : includes, public, and templates.
- Next, ensure a few directories are world-executable by executing
chmod a+x ~
chmod a+x ~/vhosts
chmod a+x ~/vhosts/pset7
chmod a+x ~/vhosts/pset7/public
so that the appliance’s web server (and you, from a browser) will be able to access your work. Then, navigate your way to ~/vhosts/pset7/public by executing the below.
you should see that public contains four subdirectories and three files. Ensure that the former are word-executable by executing the below.
chmod a+x css fonts img js
Finally, ensure that the files within those directories are world-readable by executing the below.
chmod a+r css/* fonts/* img/* js/*
If unfamiliar, * is a “wildcard character,” so css/*, for instance, simply means “all files within the css directory.”
For security’s sake, don’t make ~/vhosts/pset7/includes or ~/vhosts/pset7/templates world-executable (or their contents world-readable), as they shouldn’t be accessible to the whole world (only to your PHP code, as you’ll soon see).
-
Even though your code for this problem set will live in ~/vhosts/pset7, let’s ensure that it’s nonetheless backed up via Dropbox, assuming you set up Dropbox inside of the appliance. In a terminal window, execute
ln -s ~/vhosts/pset7 ~/Dropbox
in order to create a “symbolic link” (i.e., alias or shortcut) to your ~/vhosts/pset7 directory within your ~/Dropbox directory so that Dropbox knows to start backing it up.
- So why did we put
pset7 inside of a directory called vhosts? Well, the appliance is configured to serve “virtual hosts” (i.e., websites) out of the latter. Specifically, if you visit, say, http://pset7/ using Chrome inside of the appliance, the appliance is configured to look in ~/vhosts/pset7/public for that website’s web-accessible files. But for that to work, we also need to associate the appliance’s own IP address with pset7 so that it “resolves” via DNS to it. Rather than set up a whole DNS server to do that, we can actually edit a file called hosts in a directory called etc. Let’s do that.
In a terminal window, execute
in order to run gedit as the appliance’s “superuser” (aka “root”) so that you can edit what’s otherwise a read-only file. Carefully add this line at the bottom of that file, which will associate pset7 with the appliance’s “loopback” address (which won’t ever change):
If you encounter a Gtk-WARNING with gedit, try restarting the appliance, as via Menu > Log Out > Restart (or via VMware’s own Restart option), then try again; the warning appears to be a bug in Fedora (the appliance’s operating system).
- Alright, time for a test! Open up Chrome inside of the appliance and visit http://pset7/ then you should see below.
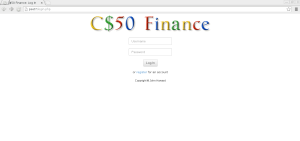
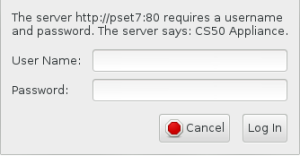
Now, head to http://pset7/phpMyAdmin using Chrome inside the appliance to access phpMyAdmin, a Web-based tool with which you can manage MySQL databases. (MySQL is a free, open-source database that lots of sites use). If you then, see the below and login as John Harvard (name jharvard and password crimson).
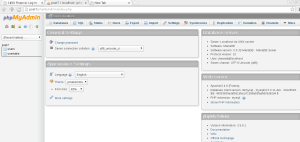
You should then find yourself at phpMyAdmin’s main page.
Then, go ahead and visit http://cdn.cs50.net/2013/fall/psets/7/pset7/pset7.sql using Chrome inside the appliance, and then open the file in gedit, as by clicking its name in Chrome’s bottom left corner. You should ultimately see a whole bunch of SQL within pset7.sql. Then highlight it and copy it by select Edit > Copy (or just hit ctrl-c).

Then, return to phpMyAdmin and click phpMyAdmin’s SQL tab, and paste everything you copied in that page’s big text box.
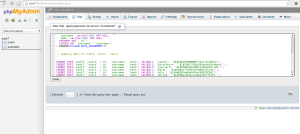
Then, click Go. You should see a green banner proclaiming Your SQL query has been executed successfully.
Okay, heads-up. Just to remind you that anytime you create a new file directory in ~/vhosts/pset7 or some subdirectory therein for this problem set, you’ll want to set its permissions with chmod. Thus far, we’ve relied on a+r and a+x, now we can use which more precise control over permissions.
For any PHP file, file, that you create, execute :
chmod 600 file
that is accessible only by you (and the appliance’s webserver).
For any non-PHP file, file, that you create (or upload), execute :
chmod 644 file
it’s accessible via browser.
And for any directory, directory, that you create, execute :
chmod 711 directory
that its contents are accessible via a browser.
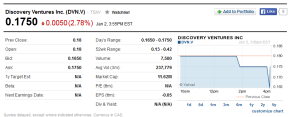
You’re about to implement C$50 Finance, a Web-based tool with which you can manage portofolios of stocks. It will also let you buy and sell stocks! If you’re not quite sure what it means to buy and sell stocks, you’ll want to surf on over http://www.investopedia.com/university/stocks/ for tutorial. Then head to http://finance.yahoo.com for teaser. Then typed symbol DVN.V you’ll see the table like below.
Now, open up index.php on gedit. Know that index.php is the file that’s loaded by default when you visit a URL like http://pset7/ .
<?php

 // configuration
 require("../includes/config.php");

 $positions = [];

 $rows = query("SELECT symbol, shares FROM usertable WHERE id = ?", $_SESSION["id"]);
 foreach ($rows as $row)
 {
 $stock = lookup($row["symbol"]);
 if ($stock !== false)
 {
 $positions[] = [
 "name" => $stock["name"],
 "price" => $stock["price"],
 "shares" => $stock["shares"],
 "symbol" => $row["symbol"],
 ];

 }
 }

 // render portfolio
 render("portfolio.php", ["positions" => $positions, "title" => "Portfolio"]);

?>
Turns out, that there’s not any HTML at all, index.php require config.php (inside the directory called includes) and then calls render ( a function that implemented in file called function.php and inside the directory called includes). And it turns out that index.php is considered a “controller”. Its purpose in life is to control the behaviour of your website when the user visits http://pset7/. By the way, you’ll create another “controllers” inside of ~/vhosts/pset7/public. More on those later.
Next, open up config.php in gedit. You should see the below.
<?php

 /**
 * config.php
 *
 * Computer Science 50
 * Problem Set 7
 *
 * Configures pages.
 */

 // display errors, warnings, and notices
 ini_set("display_errors", true);
 error_reporting(E_ALL);

 // requirements
 require("constants.php");
 require("functions.php");

 // enable sessions
 session_start();

 // require authentication for most pages
 if (!preg_match("{(?:login|logout|register)\.php$}", $_SERVER["PHP_SELF"]))
 {
 if (empty($_SESSION["id"]))
 {
 redirect("login.php");
 }
 }

?>
Okay, so config.php calls session_start in order to enable $_SESSION a superglobal variable via which we’ll remember that a user logged in. Next, config.php calls $_SESSION is an associative array in which you can store any data to which you’d like to have access for the duration of some user’s visit.
For instance, now, take your time to open up another files inside of each directories inside ~/vhosts/pset7/. You’ll want to navigate your way to ~/vhosts/pset7/templates and open up “portfolio.php” and another files. If you then, navigate your way to ~/vhosts/pset7/includes and open up “contstans.php” and “functions.php”. Then, you should find out what’s going on there.
Now, let’s make it simple. I assume you’ve read over the spec http://cdn.cs50.net/2014/x/psets/7/pset7/pset7.html. In this problem set, you’ll developt a website, for instance it is all about buy and sell stocks. It will indeed using databases for each elements of it, like INSERT-ing, SELECT-ing, DELETE-ing, and then UPDATE-ing. And this is all about how do you create them? Well, you’ll want to use SQL to do it. Let’s tackle it! Before we go for some examples, I just wanna make sure that you have to implement each of those below :
- register.php
- quote.php
- portfolio.php
- sell.php
- buy.php
- history.php
Okay, so let’s talk about an example, I used a query from login.php, it is inside of ~/vhosts/pset7/public. Notice too that login.php “remembers” that a user is logged in by storing his or her unique ID inside of $_SESSION. Take a look at below :
// remember that user's now logged in by storing user's ID in session
 $_SESSION["id"] = $row["id"];
Then, take a look at the line below :
query("SELECT * FROM users WHERE username = ?", $_POST["username"]);
Read through its line carefully, taking note of how it queries the appliance’s MySQL using that query function. That function essentially simplifies use of PDO (PHP Data Object), see http://www.php.net/manual/en/class.pdo.php for more details, it is a library with which you can query MySQL (and other) databases.
Ok, now suppose that President Skroob tries to log into C$50 Finance by inputting his username and password. That line of code will ultimately execute the SQL statement below :
SELECT * FROM users WHERE username='skroob'
But, unlike SELECTs, some SQL queries like DELETE, UPDATE, and INSERT don’t actually return rows, so that query returns might sometimes be empty.
REGISTER.PHP
It’s time to code now! First, we’ll tackle register.php. In terminal window execute :
~/vhosts/pset7/templates
then, you’ll want to execute :
cp login_form.php register_form.php
Open up register_form.php with gedit and change the value of action attribute from login.php to register.php. Add an additional field of type password to the HTML form called confirmation. So, that users are prompted to input their choice of passwords twice (to discourage mistake).
Then, using gedit, create a new file called “register.php” with contents below, but don’t forget to save it in ~/vhosts/pset7/public.
<?php

// configuration
require("../includes/config.php");

// if form was submitted
if ($_SERVER["REQUEST_METHOD"] == "POST")
{
// TODO
}

else
{
// else render form
render("register_form.php", ["title" => "Register"]);
}
?>
Pseudocode of TODO above :
- If $_POST[“username”] or $_POST[“password”] is empty or if $_POST[“password”] does not equal $_POST[“confirmation”] , you’ll want to inform registrants of their error.
- To insert new user, you might want to call :
query("INSERT INTO users (username, hash, cash) VALUES(?, ?, 10000.0)", $_POST["username"], crypt($_POST["password"]));
- Query will return false if your INSERT fails (as can happen if, say, username already exists). Be sure to check for false with === and not ==.
- If, though, your INSERT succeeds, know that you can find out which id was assigned to that user with code like below :
$rows = query("SELECT LAST_INSERT_ID() AS id");
$id = $rows[0]["id"];
- If registration succeeds, you might as well log the new user in (as by “remembering” that id in $_SESSION), there after redirecting to index.php
If done with register.php. Test it by heading to http://pset7/register.php using Chrome inside the appliance and try to register a new username. If you reach index.php, you done good! Be sure that html is valid via http://validator.w3.org/#validate_by_input .
(gambar register.php)
QUOTES.PHP
Now, let’s empower user to look up quotes for individual stocks. You’ll want to create a new controller called quotes.php inside the ~/vhosts/pset7/public plus two templates, the first of which to display an HTML form via which you can submit a stock’s symbol, the second of which displays, minimally, a stock’s lates price (if passed, via render, an appropriate value).How to look up a stock’s latest price? You’ll want to call lookup function in function.php, see below :
$stock = lookup($_POST["symbol"]);
Pseudocode :
- Display form
Display from allows the user to input the given stock symbol that they want to lookup. You’ll want to create a quote template (the form for stok lookup) for example : quote_form.php and save inside ~/vhosts/pset7/template. And don’t forget to add the form input that allows the uses to input symbol that they want to look up. Next, the form action is to send those informations to controller (i.e quote.php) that lies in the ~/vhosts/pset7/public.s
- Retrieve stock quote
The function “lookup” passing in the string of the symbol that will return an associative array.for example :
$s = lookup("AAPL");
Return an associative array :
– Symbol
– Name
– Price
- Display stock quote
We’re already have a controller called quote.php and a template called quote_form.php. Then how to display the stock quote? Well, you’ll want to create another template let’s say quote.php and save it inside the ~/vhosts/pset7/template. That will have the behaviours like below :
– At minimum, display quote
– Ensure the stock symbol is valid, else “apologize” as usual.
– print(“Price: “ . $s[“price”]); but we need to format to 2 to 4 decimal places, if not sure try to read number_format functionality.
Be sure that html is valid via http://validator.w3.org/#validate_by_input .
PORTFOLIO.PHP
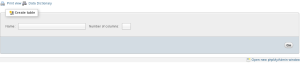
Portfolio means “collection of stocks (i.e shares company). At present, your database has no way of keeping track of user’s portfolios. How many different stocks might a user own? Better to maintain that data in a new table together so that we don’t impose limits on users’ portfolios. What sort of information need we keep in this new table in order to ‘remember’ users’ portfolios? Well, you’ll want to add a table with three fields ID, SYMBOL, and SHARES sounds pretty good. To create ne table click on pset7 in phpMyAdmin’s top left corner and click Create table as you see below, then click Go :
Next, define each of your fields (id, symbol, and shares), realize that ID should not be defined as primary key in this table. And, you shouldn’t let some id and shares to appear together in more than one row. But, you should define a “joint primary key” by selecting an Index of PRIMARY for both id and symbol. That way, INSERT will fail if you try to insert more than one row.
Be sure that html is valid via http://validator.w3.org/#validate_by_input .
Pseudocode :
For portfolio, you’ll want to display all of the stocks that the user has.
1. Make a portfolio table
2. Display the portfolio table
SELL.PHP
It’s time to implement sell with a controller called sell.php and some number of templates. I leave you to design of this feature to you. Know that you can delete rows from your tables with code like below :
DELETE FROM tbl WHERE id = 7 AND symbol = 'DVN.V'
What about the users’ balance? Your user is going to want the proceeds of all sales. So selling a stock will updating not only your table for users’ portfolios but users as well. Determine it by yourself. Example : let’s say the amount is ($400) with SQL like below it will take care of the deposit.
UPDATE users SET cash = cash + 400 WHERE id = 7
Pseudocode:
- You’ll want to display form that allows the user (i.e the stock’s owner) to get stock to sell. So, create a new template for it. But they can only sell the stock that they own. So, with code like :
SELECT * FROM portfolio WHERE id = 7
- Remove stock (that you’ve sold) from the portfolio, with code like :
DELETE FROM portfolio WHERE id = 7 AND symbol = "AAPL"
- Updating cash where the stock is sold at its current price. So, look back at “lookup” function.
BUY.PHP
Implement ability to buy with controller called buy.php and some number of templates. See http://www.cs50.net/finance for inspirations. You’ll need to to ensure that a user cannot spend more cash than he or she has on hand. You’ll want to make sure that users can only buy whole of shares of stocks. You’ll want to call :
preg_match("/^\d+$/", $_POST["shares"])
see http://www.php.net/preg_match for details. Be sure that html is valid via http://validator.w3.org/#validate_by_input .
Pseudocode :
- You’ll want to display form for the user to get the stocks, and number of shares. Well, the form is going to be an HTML form that will ask for symbol and number of shares.
- You’ll want to add stock to the portfolio. We’ll first check whether the users can afford the stock, for example :
SELECT cash FROM users WHERE id = 7
Now, they want to buy more at the same stock, then you’ll want to allow them to update the given row in the portfolio,
INSERT INTO portfolio (id, symbol, shares) VALUES(7, 'DVN.V', 10) ON DUPLICATE KEY UPDATE shares = shares + VALUES(shares)
- Then, you’ll want to update cash. A user’s cash is stored in users table. Then you’ll need to :
UPDATE users SET cash = cash – 9999 WHERE id =7
HISTORY.PHP
So your users can now buy and sell stocks and even check their portfolio’s value. But they have no way of viewing their history of transactions.
Enhance your implementations for buying and selling in such a way that you start logging transactions, recording for each:
• Whether a stock was bought or sold.
• The symbol bought or sold.
• The number of shares bought or sold.
• The price of a share at the time of transaction.
• The date and time of the transaction
Then, by way of a controller called, say, history.php and some number of templates, enable users to peruse their own history of transactions, formatted as you see fit.
Be sure that html is valid via http://validator.w3.org/#validate_by_input .
Pseudocode :
- You’ll need to add history table
- For every purchase and sale :
– Add a row to history
– Store the timestamp of transactions: you’ll want to use NOW() either CURRENT_TIMESTAMP functions.
FINAL THOUGHTS
Glance back at index.php now and, if not there already, make that it somehow links to, at least, buy.php , history.php , logout.php , quote.php , and sell.php (or their equivalents) so that each is only one click away from a user’s portfolio!
And now the icing on the cake. Only one feature to go, but you get to choose. Implement at least one (1) of the features below. You may interpret each of the below as you see fit; we leave all design decisions to you :
– Empower users (who’re already logged in) to change their passwords.
– Empower users who’ve forgotten their password to reset it (as by having them register with an email address so that you can email them a link via which to do so).
– Email users “receipts” anytime they buy or sell stocks.
– Empower users to deposit additional funds.
Be sure that html is valid via http://validator.w3.org/#validate_by_input .
For tips on how to send email programmatically, see https://manual.cs50.net/Sending_Mail
With that, you’ve completed C$50 Finance.
This was Problem Set 7.


